Guides
The Shortwave MethodCustomize your ShortwaveThe Shortwave AI AssistantCollaborate with your teamBillingSecurity & PrivacyMigrations
Migrating from GmailMigrating from SparkMigrating from SuperhumanReferences
SearchKeyboard shortcuts & commandsSupported browsersHow-tos
Use Shortwave with other email providersUnified inbox via forwardingManage multiple accountsInstall Shortwave's PWADefault email appEnable push notificationsTroubleshoot push notificationsManage auto-apply labelsIntegrate Shortwave with your CRMUsing MCP with ShortwaveTroubleshoot email syncing issuesDownload EML fileGoogle Advanced ProtectionImport full historyUpgrade, downgrade, or delete accountJoin our Discord communityManage auto-apply labels
Labels are a powerful tool for organizing email that you're probably already familiar with from Gmail. Shortwave makes them even more powerful with new organizational features like delivery schedules, bundling, push notifications, and more, streamlining your email management.
To make it easier than ever to apply labels and get the most out of Shortwave's label-powered features, we introduced auto-apply rules that let you specify when labels should be automatically applied or removed from new emails from a specific sender. Auto-apply rules sync with your existing Gmail filters to ensure a seamless transition and consistent organization across platforms.
All label settings can be configured via Settings > Filters in Shortwave.
Create an auto-apply rule
Always apply
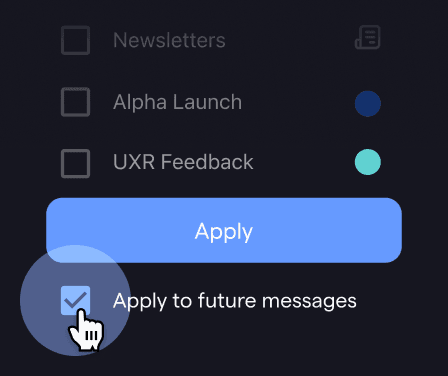
You can add an always apply rule to automatically apply a label to a specific sender by adding new labels to an email via the label picker. You will see a checkbox that reads "Apply changes to future messages." Selecting that checkbox and then clicking “Apply” will automatically add the label(s) to all new emails from the specific sender going forward.
Alternatively, on the web you can drag and drop an email thread onto a label bundle. After dropping the thread, you will see a toast appear. Click "Always apply" on the toast to create an auto-apply rule.
On mobile, you can add an always apply rule via the label picker. After selecting new labels, click the checkmark. Click "Always apply" on the following dialog to create an auto-apply rule.
Always remove
You can add an always remove rule to never automatically apply a label (like "Promotions" or "Updates") to a specific sender by deselecting labels via the label picker for a specific thread. Select the "Apply changes to future messages" checkbox to create an always remove rule which will prevent the deselected label(s) from being applied to new emails from the specific sender.
Alternatively, on the web you can remove a label chip. After clicking 'x' on a label chip, you will see a toast appear. Click "Always apply" on the toast to create an always remove rule.
On mobile, you can create an auto-remove rule via the label picker. After deselecting labels in the label picker, click the checkmark to "Apply changes to future messages." Click "Always apply" on the following dialog to create an always remove rule.
Manage auto-apply rules
You can create and remove auto-apply rules via Settings > Filters.
Guides
The Shortwave Method
Customize your Shortwave
The Shortwave AI Assistant
Collaborate with your team
Billing
Security & Privacy
How-tos
Use Shortwave with other email providers
Unified inbox via forwarding
Manage multiple accounts
Install Shortwave's PWA
Default email app
Enable push notifications
Troubleshoot push notifications
Manage auto-apply labels
Integrate Shortwave with your CRM
Using MCP with Shortwave
Troubleshoot email syncing issues
Download EML file
Google Advanced Protection
Import full history
Upgrade, downgrade, or delete account
Join our Discord community